
Whether you’re heading to a high-stakes job interview or a relaxed weekend brunch, the way you tuck in your shirt can make or break your entire outfit. A sloppy tuck creates unnecessary bulk around your waist, while a perfect tuck creates a streamlined, tailored silhouette that screams confidence.
In this guide, we will break down the professional techniques used by stylists and military personnel to ensure your shirt stays crisp, flat, and perfectly aligned all day long.
- How to Get the Perfect Tuck Fast: The 10-Second Summary
- 5 Proven Methods for a Sharp Shirt Tuck
- Step-by-Step: How to Master the "Gig Line"
- Pro-Tips for Keeping Your Shirt Tucked All Day
- 3 Common Mistakes That Ruin Your Silhouette
- Frequently Asked Questions (People Also Ask)
- Conclusion: Elevate Your Style with the Right Tuck
How to Get the Perfect Tuck Fast: The 10-Second Summary
If you’re in a rush, achieving a professional look comes down to one simple goal: eliminating excess fabric and mastering the “Gig Line.” A clean tuck ensures you look intentional and sharp rather than disheveled.
The “Golden Rule” of Tucking
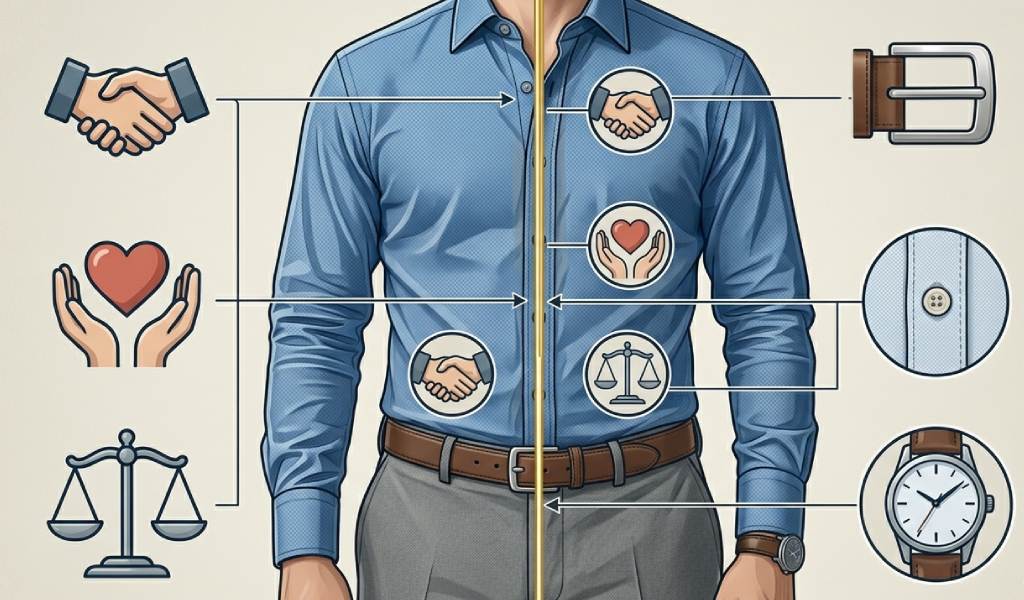
Before you even start, check the bottom edge (hem) of your shirt to see if it belongs inside or outside your pants:
- Tuck it in: If the shirt has a curved hem with long “tails” (common in dress shirts).
- Leave it out: If the shirt has a flat, straight hem (common in polos, t-shirts, and casual linen shirts).
What is the “Gig Line”?
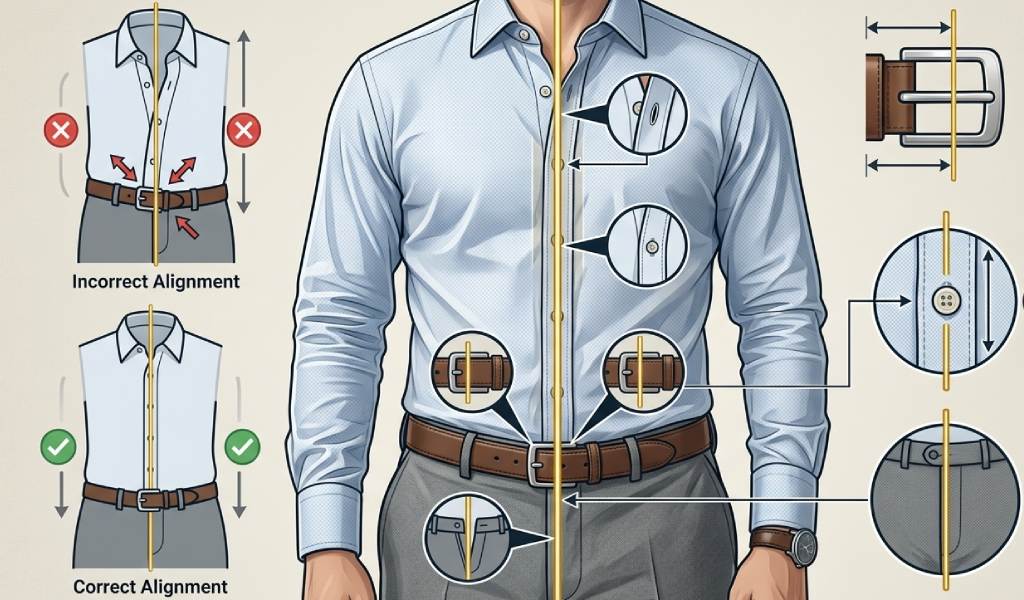
To rank among the best-dressed, you must align your Gig Line. This is the straight vertical line formed by:
- The edge of your shirt placket (the button line).
- The center of your belt buckle.
- The seam of your pant fly.
Quick Reference: 5 Tucking Methods by Occasion
Use this table to find the perfect style for your day:
| Tucking Method | Best Occasion | Effort Level | Recommended Shirt |
|---|---|---|---|
| Basic Full Tuck | Business / Formal | Low | Dress Shirt |
| Military Tuck | Slimming / Professional | Medium | Baggy Button-downs |
| French Tuck | Casual / Date Night | Low | Sweaters & Tees |
| Half Tuck | Streetwear / Edgy | Low | Flannels |
| Underwear Tuck | All-day Security | Medium | Thin Undershirts |
5 Proven Methods for a Sharp Shirt Tuck
Mastering the art of the tuck can instantly elevate your style from sloppy to sophisticated. Whether you are dressing for a boardroom meeting or a casual coffee date, the right technique makes all the difference. Here are five proven methods to ensure your shirt stays perfectly in place.
1. The Basic Full Tuck (The Formal Standard)

This is the most common technique and the gold standard for formal attire. It is designed for dress shirts paired with slacks or suit trousers.
- When to use: Weddings, job interviews, or office environments.
- The Technique:
- Put on your shirt and button it all the way to the top.
- Step into your trousers and pull them up over the shirt tails.
- Before buttoning your pants, reach inside and smooth the fabric flat against your hips and stomach.
- Fasten your pants and belt.
- Key Detail: Ensure the shirt is pulled down taut so there is no excess fabric “blooming” over your belt line.
2. The Military Tuck (The “Fit” Fixer)
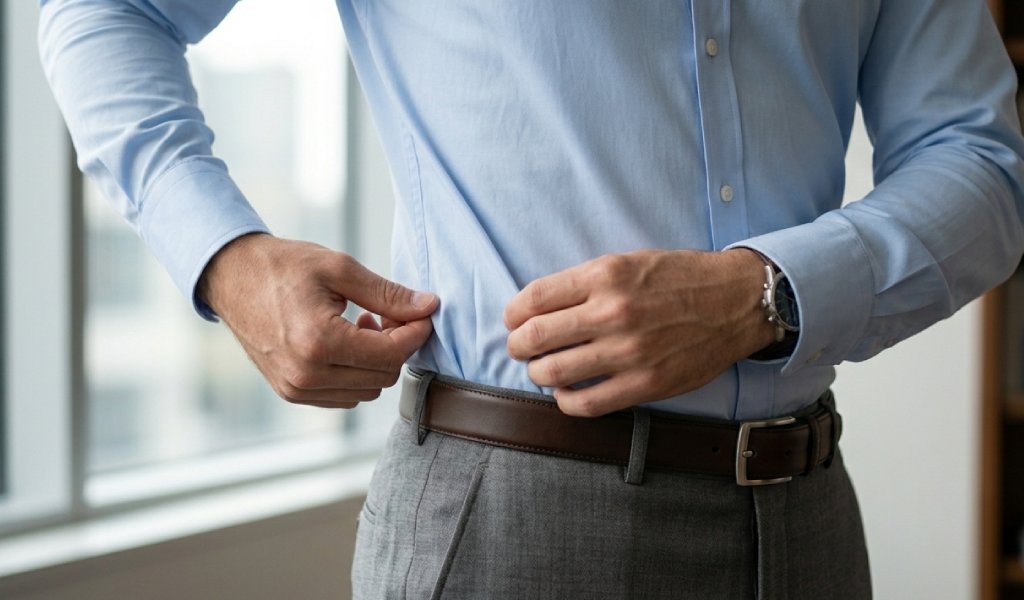
If your shirt is a bit too baggy or wasn’t custom-tailored, the Military Tuck is your best friend. This method uses strategic folding to remove extra fabric from the waist.
- When to use: When wearing “off-the-rack” shirts that have too much room in the sides.
- The Action:
- Stand with your pants unbuttoned.
- Pinch the excess fabric at the side seams between your thumb and forefinger.
- Fold that pinched fabric backward toward your rear, creating a sharp vertical pleat.
- Hold the folds tight against your body while you button your pants.
- The result is a slim-fit appearance without a trip to the tailor.
3. The French Tuck (The Fashion Favorite)
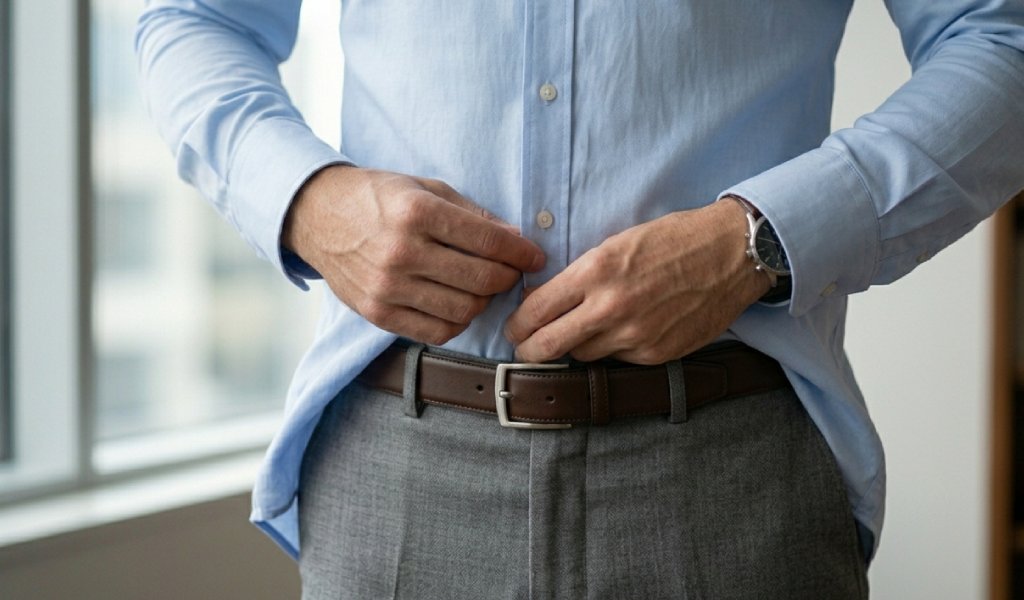
Popularized by style expert Tan France, this “effortlessly cool” tuck bridges the gap between formal and casual. It provides structure to your outfit while remaining relaxed.
- When to use: Best for sweaters, T-shirts, and casual button-downs paired with jeans or chinos.
- The Technique:
- Take the front center part of your shirt hem.
- Tuck just that section (about 2–4 inches wide) into your waistband.
- Let the sides and the back of the shirt hang loose and natural.
- Pro Tip: This is the perfect way to show off a statement belt buckle without looking too “stiff.”
4. The Half Tuck (The Asymmetrical Casual)

This is a high-fashion, streetwear-inspired move. It is intentionally messy and works best with button-down shirts left slightly unbuttoned at the bottom.
- When to use: Weekend outings, creative workspaces, or street-style photography.
- The Technique:
- Unbutton the very last button of your shirt.
- Tuck in only the button-hole side (the flap that overlaps) into your pants.
- Leave the side with the buttons hanging out.
- Style Note: This creates an asymmetrical line that adds visual interest and a “vibe” of being well-dressed but unbothered.
5. The Underwear Tuck (The All-Day Security)

If you find yourself constantly re-tucking your shirt throughout the day, this hidden trick is a game-changer. It focuses on the foundation of your outfit.
- When to use: Long workdays, dancing at events, or when you’re wearing slippery fabrics like silk.
- The Technique:
- Put on your undershirt first.
- Tuck your undershirt directly into your underwear.
- Put on your dress shirt over the undershirt.
- Tuck your dress shirt into your trousers as you normally would.
- Why it works: The friction between the undershirt and the underwear creates a “lock.” This prevents the dress shirt from sliding up against your skin every time you move or sit down.
Step-by-Step: How to Master the “Gig Line”
If you want to look like a professional rather than an amateur, you must master the “Gig Line.” Even the most expensive tailor-made shirt will look sloppy if this one detail is ignored.
What is a Gig Line?
The Gig Line is a military term used to describe the straight vertical line running down the center of a man’s torso. It is formed by the alignment of three specific elements:
- The shirt placket (the vertical strip where the buttons are).
- The edge of the belt buckle.
- The trouser fly (the seam of your pants zipper).
When these three are perfectly aligned, it creates a sense of symmetry that makes you look taller, slimmer, and significantly more “put together.”
How to Achieve the Perfect Gig Line
Follow these four simple steps to lock in your look:
Step 1: Button Your Shirt Completely
Start with a solid foundation. Ensure every button on your shirt—from the collar down to the very last button—is fastened. If the bottom buttons are loose, the fabric will shift, making it impossible to keep a straight line.
Step 2: Pull Your Trousers Up Taut
Put on your trousers and pull them up to your natural waistline. While holding the waistband open slightly, reach down and pull your shirt tails downward until the fabric is taut against your chest and back. This removes the “billowing” effect often seen around the waist.
Step 3: The Alignment Check
This is the critical moment. Look in the mirror and adjust your clothing so that:
- The vertical line of your shirt buttons falls exactly in the center.
- The leading edge of your belt buckle sits right against that line.
- Both align perfectly with the stitching of your pant fly.
Step 4: Fasten and “Lock” the Look
Once everything is centered, fasten your belt. The belt acts as the “anchor” that holds the shirt and pants in place. Double-check the alignment after tightening your belt, as the pulling motion can sometimes shift the buckle to the left or right.
Pro-Tips for Keeping Your Shirt Tucked All Day
Achieving a perfect tuck is easy; keeping it that way for eight hours is the real challenge. If you find yourself constantly “re-tucking” in the bathroom, these expert strategies will provide the all-day security you need.
Use Shirt Stays for Ultimate Security
For high-stakes days—like a wedding or a major keynote presentation—relying on your belt alone isn’t enough. Professional style icons and military personnel use shirt stays to maintain a crisp look.
- Garter-Style Stays: These are elastic straps that connect the bottom of your shirt to your socks. They provide constant downward tension, ensuring your shirt never “muffins” out.
- Magnetic Stays: A modern, clip-less alternative that uses high-strength magnets at the waistband to lock the fabric in place without any visible straps.
- Belts with Internal Grips: Look for belts or trousers with a rubberized “friction strip” inside the waistband to help grab the shirt fabric.
The “Raise Your Arms” Test
A common mistake is tucking a shirt so tightly that you can’t move. To find the perfect balance between “neat” and “functional,” always perform this test:
- Complete your tuck and fasten your belt.
- Raise both arms straight above your head as if reaching for a high shelf.
- Bring your arms back down to your sides.
This movement pulls just the right amount of fabric (about half an inch to an inch) out of the waistband. This “slack” ensures that when you sit down or reach for your phone, the shirt has enough room to move without popping out of your pants entirely.
Choose the Right Fabric
Not all shirts are created equal when it comes to staying power. The texture and weight of the material dictate how much it will slide against your trousers.
- The Winners: Heavyweight or textured fabrics like Poplin, Twill, and Oxford cloth have enough “grip” to stay seated against your waistband all day.
- The Challengers: Smooth, lightweight fabrics like Silk, Linen, or Sateen are incredibly slippery. These materials require extra help from a tighter belt or shirt stays to prevent them from sliding up every time you move.
3 Common Mistakes That Ruin Your Silhouette
Even with the best tucking technique, a few small errors can completely sabotage your look. To maintain a sharp, streamlined appearance, avoid these three common pitfalls that create an unbalanced silhouette.
1. The “Muffin Top” Effect
This is perhaps the most frequent mistake men make. It happens when you pull out too much excess fabric from your waistband after tucking, usually in an attempt to feel “comfortable.”
- The Problem: The fabric billows out over your belt, creating a rounded shape that makes your waist look wider than it is.
- The Fix: Use the “Raise Your Arms” test mentioned earlier to get just the right amount of slack. If you still have too much fabric at the sides, switch to a Military Tuck to fold that extra material flat against your body.
2. Tucking Into Low-Rise Pants
Low-rise trousers sit much further down on your hips than traditional mid-rise or high-rise pants. While they might be trendy, they are the enemy of a secure tuck.
- The Problem: Because the waistband is lower, there is less “depth” to hold your shirt tails in place. Every time you sit down, reach up, or twist your torso, the shirt hem is pulled upward and will eventually pop out of the pants.
- The Fix: If you plan on tucking in your shirt, opt for mid-rise or high-rise trousers. They provide more coverage for the shirt tails and ensure everything stays tucked regardless of your movement.
3. Bulky Pockets
A clean silhouette isn’t just about the shirt; it’s about everything happening at your waistline. Your pockets play a huge role in how your pants—and consequently your shirt—sit on your body.
- The Problem: Carrying a thick “dad” wallet, a large smartphone, or a heavy set of keys pulls the waistband of your pants downward. This tension creates uneven pulling on your tucked shirt, ruining the straight lines of your Gig Line and causing the fabric to bunch awkwardly.
- The Fix: Slim down your everyday carry. Use a minimalist cardholder, carry your keys in a jacket pocket, or utilize your bag. This keeps the waistband level and your tuck perfectly symmetrical.
Frequently Asked Questions (People Also Ask)
To help you navigate the nuances of style, we’ve answered the most common questions about shirt tucking. These insights will help you adapt your look for any occasion.
How do I stop my shirt from bunching at the back?
The secret to a flat, smooth back is the Military Tuck applied to the rear. Instead of simply stuffing the fabric in, reach behind you and pinch the excess material at the side seams.
Fold these “darts” or pleats toward your spine (the back-fold) before tightening your belt. This anchors the fabric against your lower back, preventing that annoying “air bubble” or bunching effect.
Should I tuck in a polo shirt?
Whether you tuck a polo depends on two things: hem length and formality.
- Tuck it in: If the polo has a long “tennis tail” (longer in the back than the front) or if you are at a golf club, business-casual office, or formal event.
- Leave it out: If the hem is straight and hits right at the mid-zip of your fly, and you are in a purely casual setting like a backyard BBQ.
What is the best way to tuck a shirt into jeans?
For a modern, effortless look with denim, go with the French Tuck. Tucking a shirt fully into jeans can sometimes look too stiff or dated. By tucking just the front center and letting the sides drape naturally, you create a balanced silhouette that looks intentional but relaxed.
If you prefer a full tuck with jeans, ensure you use a casual leather belt to bridge the gap between the rugged denim and the structured shirt.
Does tucking in your shirt make you look thinner?
Yes, a clean tuck can actually create a slimming effect. Leaving a shirt untucked—especially a baggy one—creates a “tent” effect that hides your natural shape and adds visual bulk.
By tucking in your shirt, you define your natural waistline and create a clear division between your upper and lower body. This verticality, combined with a properly aligned Gig Line, draws the eye up and down, making you appear taller and more streamlined.
Conclusion: Elevate Your Style with the Right Tuck
Mastering the art of the shirt tuck is more than just a grooming habit; it is a fundamental style skill. You don’t always need an expensive tailor to look sharp. In fact, a great tuck is the cheapest way to look like you’re wearing a tailored shirt. By simply managing excess fabric and aligning your silhouette, you instantly transform a standard “off-the-rack” garment into a custom-fit look.
Whether you choose the crisp precision of the Military Tuck for the office or the relaxed vibe of the French Tuck for a weekend brunch, your attention to detail speaks volumes about your personal brand. Remember, style is built on the small things—a straight Gig Line, the right amount of slack, and the confidence to move naturally.
Now that you’ve mastered the mechanics, it’s time to put them into practice and see which one fits your daily routine best.